Getting to Kilimanjaro

Getting to Kilimanjaro

5 STAR RATED TOUR OPERATOR IN TANZANIA
Rated 5 out of 5
Here’s a guide on how to reach Kilimanjaro from various parts of the world and the nearest beach holiday destinations.

Flying Directly to Kilimanjaro International Airport (JRO):

The most convenient way to reach Kilimanjaro is by flying directly into Kilimanjaro International Airport (JRO). Airlines like KLM/Kenya Airways, Ethiopian, Turkish and Condor Airlines provide services to this gateway. Upon arrival, you can get a private taxi transfer to Moshi for $50-$60 one way. Alternatively we can arrange this for you.

From Nairobi to Kilimanjaro

  • Flight Option: For swift access, Kenya Airways and Precision Airways offer regular flights connecting Nairobi (NBO) and Kilimanjaro (JRO), with online booking options.
  • Riverside Bus Shuttle: The “Riverside” bus shuttle links Nairobi and Moshi. This six-hour journey costs $40 per person each way and departs daily from Nairobi at 8 am. Be sure to arrive 30 minutes early for luggage loading. The shuttle stops at the Tanzanian border for immigration and customs checks, requiring a visa for entry into Tanzania. The route also includes a stop in Arusha for a shuttle switch and lunch.
  • Private Car: Opt for a more personalized experience by taking a private car from Nairobi to Moshi. This option accommodates 7-8 people or a mini-bus for 20-25 passengers. You have control over pickup time and location, and the cost for a 7-8 person car is around $500 one way.

From Dar es Salaam to Kilimanjaro

  • Bus Journey: Buses between Dar es Salaam and Moshi provide a cost-effective option, with fares around $50 per person for an 8-hour one-way trip. Morning departures are available.
  • Domestic Flight: Swiftly bridge the distance with a domestic flight taking approximately 1 hour, costing around $240 one way.

From Mombasa to Kilimanjaro

Flights to/from Mombasa are available at a cost of about $150.

From Zanzibar to Kilimanjaro

If your Tanzanian journey leads you to Zanzibar, international flights are accessible to/from Zanzibar. Domestic flights connecting Zanzibar (ZNZ) and Kilimanjaro (JRO) are priced at approximately $240 one way per person. ——————- For those journeying to Kenya, note that visa costs amount to at least $50 per person. Arrival at least one day ahead of your Kilimanjaro trek or safari is advised, granting time for acclimatization.  

Internet and Mobile Reception on Mount Kilimanjaro

Internet and Mobile Reception on Mt. Kilimanjaro

5 STAR RATED TOUR OPERATOR IN TANZANIA
Rated 5 out of 5

Are there WiFi and cell service on Kilimanjaro?

In August 2022, the Tanzania Telecommunications Corporation achieved a significant feat by providing broadband connectivity for Kilimanjaro climbers up to an altitude of 3,720 meters (12,200 feet). This advancement brought internet access to one of Africa’s most iconic natural wonders. At present, this service operates along the Marangu route, offering WiFi at Mandara Hut, Horombo Hut, and Kibo Hut. These WiFi points are solar-powered, and although occasionally deactivated to conserve energy for lighting, the signal remains robust. During the climb, WiFi calls and even video calls were possible. The future plan involves extending WiFi coverage to Kilimanjaro’s summit, followed by laying cables along the Lemosho route. The ultimate aim is to establish WiFi service across all routes on Kilimanjaro.

Mobile Reception on Kilimanjaro

Reliable cell phone service isn’t guaranteed on Mt. Kilimanjaro due to its extreme conditions. Nonetheless, this doesn’t mean you’ll be cut off from your loved ones. During your Kilimanjaro climb, you should have at least one daily opportunity to communicate. To optimise communication chances, feel free to ask our friendly guides about signal hotspots. They’ll gladly identify these locations along the journey. Additionally, keep an eye out for local porters—when you spot them rushing uphill from camp, they’re likely heading to a signal zone! For efficient battery usage, consider switching your phone to airplane mode to prevent continuous signal searching. This conserves battery life, ensuring you don’t miss out on capturing unforgettable moments due to a dead phone.

Mobile Signal Challenges on the Mountain

Anticipate disruptions in mobile signals while ascending the mountain due to extreme climate conditions. Water vapor, especially during rainfall, snowfall, fog, and high humidity, can obstruct cellular signals. The conductivity of water affects radio waves, leading to signal disturbances.

Getting a Local SIM Card

Upon arriving in Tanzania, you can obtain a local SIM card by registering with your passport. However, this process can be time-consuming, making it advisable for stays over two weeks. Typically costing around TSh 1,000, equivalent to roughly US$0.41, obtaining a local SIM card is quite affordable!

Internet Providers in Tanzania

Tanzania boasts various internet service providers (ISPs) offering cellphone services. You can purchase a local SIM card in Arusha or Moshi Town. Notable ISPs include: Vodacom Tanzania: Leading among mobile network operators, Vodacom offers diverse cellphone internet services, including data plans and bundles. Airtel Tanzania: Another major telecom operator, Airtel provides internet services for cellphones, featuring an array of data plans and bundles. Tigo Tanzania: Known for its mobile network services, Tigo offers distinct data packages and plans for cellphone users. Halotel: This telecommunications company extends mobile and internet services, offering various cellphone internet plans. Zantel: A telecom operator, Zantel provides cellphone internet services through a range of data plans.

Charging Your Devices on the Mountain

Traditional charging spots aren’t available on the mountain, so alternative methods are necessary. These include:
  1. Power Banks: Carrying fully charged power banks allows you to charge phones and cameras via USB cable. Be mindful that certain airlines have restrictions on lithium batteries, so consider carrying power banks in your carry-on baggage.
  2. Solar Chargers: While solar chargers are often considered for remote charging, they aren’t particularly efficient on the mountain. They have limited power storage, are slow to charge, and can be bulky.
Ensuring your devices stay charged on Kilimanjaro requires prudent planning and preparation in light of the mountain’s unique conditions.

Tipping Guidelines for Your Mount Kilimanjaro Trek

Tipping Guidelines for Your Mount Kilimanjaro Trek

5 STAR RATED TOUR OPERATOR IN TANZANIA
Rated 5 out of 5
Tipping is a customary tradition when trekking on Mount Kilimanjaro and is an expected practice. While some might be new to this custom, especially if they come from regions where tipping isn’t common, it’s important to understand its significance on the mountain. The tipping amounts are larger than what you might have encountered on previous treks due to the unique crew setup on Kilimanjaro. For instance, a group of 6 trekkers is supported by a team of 23 members, including senior guides, assistant guides, cooks, and porters.

Why Isn’t Tipping Included in the Price?

Tipping has deep cultural meaning on Kilimanjaro and has evolved over the years into its present form. Our company maintains a transparent approach to tipping. We provide guidelines about what the crew typically expects, but it’s essential to note that you directly give tips to the crew members. Incorporating tips into the overall price isn’t practical for a couple of reasons. Firstly, including tips could lead to concerns of clients being overcharged for tips while the crew isn’t fairly compensated, creating transparency issues. Secondly, tip amounts can vary depending on the group size, which can’t be predicted in advance.

Our Tipping Recommendations

While our staff appreciates larger tips, following the recommended tipping guidelines below will be highly valued by the crew. Keep in mind that the amounts provided are intended for the entire group. For example, if the group collectively tips $15 to the cook per day, this amount will be divided among all group members.
  • Senior guide: $20 – 25 per day for the entire group
  • Assistant guide: $15 – 20 per day for the entire group
  • Cook: $12 – 15 per day for the entire group
  • Waiter: $10 – 12 per day for the entire group
  • Porter: $8 – 10 per day for the entire group
  • Summit porter: $12 – 15 per day for the entire group
  • Toilet crew: $10 – 12 per day for the entire group

Crew for Different Group Sizes

To accurately calculate tips, it’s important to understand the size of your support team. Here’s the breakdown of the crew size for different group sizes, ranging from 1 to 10:
  • Group of 1 – 1 Senior Guide, 1 Cook, 3 or 4 Porters
  • Group of 2 – 1 Senior Guide, 1 Assistant Guide, 1 Cook, 6 Porters
  • Group of 3 – 1 Senior Guide, 1 Assistant Guide, 1 Cook, 9 Porters
  • Group of 4 – 1 Senior Guide, 1 Assistant Guide, 1 Cook, 12 Porters
  • Group of 5 – 1 Senior Guide, 2 Assistant Guides, 1 Cook, 15 Porters
  • Group of 6 – 1 Senior Guide, 2 Assistant Guides, 2 Cooks, 18 Porters
  • Group of 7 – 1 Senior Guide, 2 Assistant Guides, 2 Cooks, 21 Porters
  • Group of 8 – 1 Senior Guide, 3 Assistant Guides, 2 Cooks, 24 Porters
  • Group of 9 – 1 Senior Guide, 3 Assistant Guides, 2 Cooks, 27 Porters
  • Group of 10 – 1 Senior Guide, 3 Assistant Guides, 2 Cooks, 30 Porters

How to Give Tips to the Crew

A recommended approach is to pool the tips from the entire group and then distribute them among the crew. Place the tips in separate envelopes and personally give them to each crew member. Alternatively, prepare two envelopes: one for the guide, assistant guides, and cooks, to be handed to the lead guide; and another for the porters, to be handed to the representative porter.

Expected tip amounts per client for some common routes and group sizes.

Group of 1
Group of 2
Group of 3
Group of 4
Group of 5
5 Days Marangu
$280 – $350
$238 – $300
$198 – $250
$179 – $225
$182 – $230
6 Days Marangu
$336 – $420
$285 – $360
$238 – $300
$215 – $270
$218 – $276
6 Days Machame
$336 – $420
$285 – $360
$238 – $300
$215 – $270
$218 – $276
7 Days Machame
$392 – $490
$333 – $420
$278 – $350
$250 – $315
$255 – $322
7 Days Lemosho
$392 – $490
$333 – $420
$278 – $350
$250 – $315
$255 – $322
8 Days Lemosho
$448 – $560
$380 – $480
$317 – $400
$286 – $360
$291 – $368

To help you calculate, here are the tip amounts broken down for each crew member

Senior Guide
Assistant Guide
Cook
Porter
5 Days Trek
$100 – $125
$75 – $100
$60 – $75
$40 – $50
6 Days Trek
$120 – $150
$90 – $120
$72 – $90
$48 – $60
7 Days Trek
$140 – $175
$105 – $140
$84 – $105
$56 – $70
8 Days Trek
$160 – $200
$120 – $160
$96 – $120
$64 – $80

What Are the Toilet Facilities Like on Mount Kilimanjaro?

What Are the Toilet Facilities Like on Mount Kilimanjaro?

5 STAR RATED TOUR OPERATOR IN TANZANIA
Rated 5 out of 5
Our usual toilet experiences differ significantly from those on Mount Kilimanjaro. In this article, we’ll explore the available toilet options on the mountain, ranging from basic campsite facilities to the possibility of private portable solutions.

Using Toilets on Kilimanjaro 

Every campsite on a Kilimanjaro trek is equipped with public toilets. However, it’s important to adjust your expectations. These are not the porcelain thrones with locking doors and soap dispensers that you might be accustomed to. Instead, you’ll find basic wooden structures, often lacking doors, surrounding a deep hole in the ground. Prepare for squatting and minimal privacy. Kilimanjaro National Park staff work hard to maintain these facilities, but the sheer volume of climbers presents challenges. As a result, the communal ‘long drop’ toilets can emit strong odors, making the experience uncomfortable and unsanitary.

Private Toilets on Kilimanjaro 

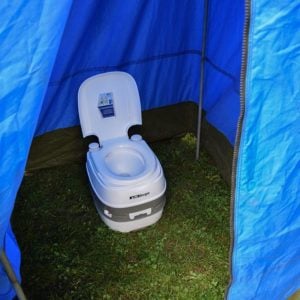
Yes, we offer “portable private toilets.” These are fully equipped chemical toilets enclosed in their own discreet tents for complete privacy. This private restroom is reserved exclusively for you and your group’s use. Similar to the basic facilities, this portable toilet is set up and accessible only at the campsite. The porters responsible for the trek ensure the cleaning, maintenance, and transportation of these portable toilets between camps. This guarantees hygienic and private restroom breaks for you.

Using Toilets Between Camps 

For urination, if necessary, you can discreetly find a private spot behind a tree or bush. It’s advisable to inform your guide to avoid any misunderstandings. As you ascend beyond the tree line, finding cover becomes more challenging. You might find larger shrubs or boulders for privacy. Carrying a suitable container can be a practical solution for both urination and defecation. Specialized products like Shewee for women and Peebol for everyone are available on platforms like Amazon. There are also “personal toilet” kits designed for events like festivals that work well for Kilimanjaro treks. Having a container proves useful during the hike and at night. If you need to defecate while on the trail, find a secluded spot, and use disposable plastic bags for waste collection. Carry toilet paper and wet wipes for cleanup. Proper disposal is crucial, and you must take everything with you to the next campsite. The porters will manage it from there.

Understanding Long Drop Toilets 

A long drop toilet, also known as a pit latrine, is a simple setup where human waste is collected in a hole in the ground beneath the toilet seat. This can function with or without flowing water. Long drop toilets are designed to reduce the spread of diseases and pathogens through flies.

Maintaining Long Drop Toilets 

The maximum depth for a long drop toilet is typically one meter below ground level. Once it’s filled up to about 330mm, a new hole must be dug. After use, the hole must be thoroughly covered with soil for proper disposal.

Kilimanjaro National Park Fees

Kilimanjaro National Park Fees in 2023

5 STAR RATED TOUR OPERATOR IN TANZANIA
Rated 5 out of 5
Climbing Mount Kilimanjaro comes with a surprising cost – ranging from $1500 to $3000, depending on the route, group type, and operator. A major contributor to this expense is the Kilimanjaro National Park fees, mandated by KINAPA (Kilimanjaro National Park Authority) for park entry. These fees constitute a significant portion, around 50-70%, of the overall climbing expense. Let’s delve into how these fees function, dissect their components, and uncover available discounts.

Deconstructing Kilimanjaro Park Fees

The latest Kilimanjaro National Park fees for 2020/2021 can be found here, which are likely to remain the same for 2022 and 2023. The fees encompass six main components:

1. Conservation Fees

The Conservation fee safeguards and maintains the National Park. It’s set at US$70 per trekker per day, applicable for every day spent within the park. For instance, a 7-day Machame trek would incur $490 ($70 multiplied by 7 days).

2. Camping Fees

Except for the Marangu route, all other Kilimanjaro routes involve camping at public campsites. The National Park administers and sustains these sites, charging $50 per trekker per night of camping. For instance, a 7-day Machame trek entails 6 nights of camping, resulting in a total camping fee of $300 ($50 multiplied by 6 nights).

3. Hut Fees

Hut fees pertain solely to hikers on the Marangu route. The National Park manages and maintains the huts at Mandara, Horombo, and Kibo camp. The fee amounts to $60 per trekker per night. Therefore, a 6-day Marangu trek accumulates a total hut fee of $300 (5 nights multiplied by $60).

4. Rescue Fees

Rescue fees are mandatory regardless of whether you require rescue assistance or not. The cost stands at $20 per trekker per trip.

5. Crater Camping Fees

Hikers opting to camp within Kilimanjaro’s crater are charged an extra fee of $100 per trekker per night.

6. Guide and Porter Entrance Fees

Guides and porters also incur entrance fees set at $2 per support crew member per trip. As this cost is distributed among numerous hikers within a group, it remains relatively negligible. Additionally, a Value Added Tax (VAT) of 18% is applied to all fees, introduced by the Tanzanian government in 2016.

How to Calculate Your Total Park Fee

Based on the components above, it’s straightforward to compute the total park fee based on your chosen route and number of trekking days. For example, let’s consider the 7-day Lemosho route. The complete park fee would be:
  • Conservation fee: 7 x $70 per day = $490
  • Camping fee: 6 nights x $50 per night = $300
  • No hut fees
  • Rescue fee: $20
  • No crater camp fee
  • Excluding guide and porter entrance fees due to their variability and insignificance
  • Total cost: $820 + 18% VAT = $955.80
For your convenience, the Kilimanjaro park fees for popular routes are outlined below. Please note that these fees exclude porter and guide entrance fees.
  • Marangu 5 days = USD 719.80 per trekker
  • Marangu 6 days = USD 873.20 per trekker
  • Machame 6 days = USD 814.20 per trekker
  • Machame 7 days = USD 955.80 per trekker
  • Lemosho 7 days = USD 955.80 per trekker
  • Lemosho 8 days = USD 1097.40 per trekker
  • Rongai 6 days = USD 814.20 per trekker
  • Rongai 7 days = USD 955.80 per trekker
  • Umbwe 6 days = USD 814.20 per trekker
  • Umbwe 7 days = USD 955.80 per trekker

Direct Payment and Discounts

You cannot directly pay park fees to KINAPA. Only registered tour operators can process park fee payments. All Kilimanjaro operators include the Park Fee in their total tour cost. Discounts are available for students, national residents, and East African citizens:
  • Children Under-16: Discounts for conservation and camping fees
  • Tanzanian Residents and Ex-Pats: 50% reduction in conservation fees
  • East African Citizens: Substantial discounts on all fees
To sum up, Mount Kilimanjaro National Park fees contribute significantly to the total climbing expense.

What Do I Need to Carry During the Day on Mount Kilimanjaro?

What Do I Need to Carry During the Day on Mount Kilimanjaro?

5 STAR RATED TOUR OPERATOR IN TANZANIA
Rated 5 out of 5
Your responsibility is to carry items from your checklist that you’ll need before reaching your next campsite. Our dedicated porters will manage your other belongings. A backpack with a capacity of around 30 liters (2000 cubic inches) is ideal for this purpose. Climbers should organize their own daypacks or backpacks and place other items in a duffel bag for the porters. The content of your daypack should match your potential needs throughout the day. The rule of thumb is to carry only what you’ll likely use. For instance, you won’t require cold weather gear in the rainforest, and bug spray becomes less relevant at higher altitudes.

What to Pack in Your Day Pack for Kilimanjaro Trek

Equipped with your trekking outfit including a hat, shirt, underwear, hiking pants, socks, and boots, let’s explore what goes into your daypack. Weather Protection:
  • Sunglasses for eye protection
  • Buff or Neck Gaiter (optional)
  • Knit Hat for warmth
  • Soft Jacket (fleece or soft-shell)
  • Waterproof Jacket (breathable with hood)
  • Thin Gloves
  • Waterproof Pants (breathable)
  • Trekking poles (optional, but recommended, especially for the summit)
Hydration and Energy:
  • Water Bottle (Nalgene, 32 oz.)
  • Water Bladder (Camelbak type, 3 liters)
  • Snacks (lightweight, high calorie, high energy – optional)
  • Electrolytes (powder or tablets – optional)
Essential Miscellaneous:
  • Camera (with extra batteries – optional)
  • Lip Balm
  • Sunscreen
  • Hand Sanitizer
  • Toilet Paper
  • First Aid Kit
  • Assorted Bags
These items build the foundation of your daypack essentials. Be mindful that specifics may change based on factors such as travel time to camp, terrain, weather conditions, and personal needs. Feel free to consult your guide if you’re uncertain about your pack. Their expertise ensures your readiness for your Kilimanjaro expedition.

How to Organize Your Day Pack

Creating a well-organized day pack is key to avoiding chaos and ensuring easy access to your essentials. Avoid random packing that can result in items falling out or getting misplaced. Instead, use a systematic approach with plastic bags, dry bags, or stuff sacks to categorize and secure your belongings. For instance, group small items like prescriptions, sunscreen, lip balm, and hand sanitizer in a zip-lock bag. Snacks can be organized separately, while clothing accessories like hats, gloves, and neck gaiters can be placed in a stuff sack.

Maintaining proper balance is crucial

Position heavier items like water bottles closer to the center of your back to maintain a balanced center of gravity in line with your spine. Avoid uneven placement, which can lead to awkward tilting. If available, use compression straps to secure items and prevent shifting while walking. Consistency in item placement is essential, whether in the main compartment, side pockets, or pant pockets. This ensures easy access without fumbling for essentials.

What Goes in Your Duffel Bag?

Pack all items not needed in your daypack into your duffel bag. Porters will carry your duffel bag between campsites. While climbers depart in the morning, porters dismantle tents and clean the campsite before moving ahead to set up the next campsite. Climbers typically reunite with their porters at the next overnight stop. Access to porter-carried gear becomes available at day’s end. The Kilimanjaro park authorities set a weight limit of 15 kilograms for duffel bags. To keep belongings organized and dry, use plastic or dry bags. While a backpack is an option, a duffel bag is preferred due to porter load-carrying methods. This makes a duffel bag a more suitable choice for the journey.

Which Month to Climb Kilimanjaro

Which Month to Climb Kilimanjaro

5 STAR RATED TOUR OPERATOR IN TANZANIA
Rated 5 out of 5
Choosing the right time to conquer Kilimanjaro greatly impacts your experience. Each month brings distinct conditions and challenges. Below we crispy summarize the Kilimanjaro journey, month by month.

January

January offers a promising start to the year for Kilimanjaro climbers. The weather is warmer, and rain and clouds are less frequent, making it an appealing choice. However, expect higher trekker traffic due to favorable conditions. Be aware that the unpredictable mountain weather can still bring storms rolling in from the nearby Indian Ocean.

February

Considered one of the top months for Kilimanjaro climbs, February provides optimal conditions. With fewer clouds and better weather compared to other months, February offers an excellent chance of a successful ascent. However, the dry weather can lead to dusty trails, so prepare for this challenge. Keep in mind that even during February, the mountain’s weather can still vary, so be ready for fluctuations.

March

March brings challenges to Kilimanjaro trekkers. Clouds tend to cover the mountain, and both rain and snow are prevalent. The terrain becomes slippery, and reduced visibility can make navigation difficult. While fewer climbers choose March, those who do must be prepared for wet and potentially challenging conditions.

April

April is a month of mixed conditions for Kilimanjaro climbs. While clear skies might grant splendid views, frequent rain and thunderstorms are likely. This month falls within the rainy season of Kilimanjaro, which spans from mid-March to May. Although fewer climbers venture out in April, the wetness can make the landscape less inviting.

May

While recent years have shown drier Mays, traditionally, this month remains wetter. Rainfall is common, and clear skies can offer breathtaking vistas. However, expect sporadic rain and thunderstorms, especially later in the month. Despite the rain, fewer climbers are present, offering a balance between solitude and weather considerations.

June

June usually marks the end of the rainy season and the beginning of drier conditions. However, occasional rainfall can still occur, especially early in the month. June provides warmer temperatures compared to other months and is generally a good time to climb Kilimanjaro. Expect more trekkers on the trails than in February, August, or September.

July

July sees a rise in Kilimanjaro climbers due to school vacations and favorable weather conditions. While the higher sections can be colder, the overall weather is pleasant. Colder temperatures often accompany clearer mountain views, reduced rain in the rainforest, and generally positive climbing conditions.

August

August continues to be a favorite month for Kilimanjaro ascents. The weather is generally dry and clear, although trails might become dusty in the wind. This month offers warmth and relatively fewer clouds, enhancing mountain views. It’s a great time to explore spots like the Shira Plateau and Volcano.

September

September remains a preferred month for Kilimanjaro climbing. Warmer conditions are experienced at altitudes above 5,000m/17,000 feet. The number of trekkers can vary, but choosing a longer acclimatization program will likely help avoid crowds and increase summit success rates.

October

October presents favorable conditions for Kilimanjaro climbing. Warmer temperatures higher up make for a comfortable ascent. While slight cloud cover might appear toward the end of the month, early October is typically more stable. It’s a good time to experience both pleasant weather and striking vistas.

November

November introduces more challenges due to increased rainfall. Mini rainy seasons might occur, leading to frequent rain and limited visibility. The unpredictable weather and wet conditions make November a less ideal choice for climbing Kilimanjaro.

December

December can still be a viable time for Kilimanjaro ascents. Some climbers opt for early December and the Christmas period for their trek. While conditions can vary from year to year, this period often offers decent weather. Keep in mind that stability might not be as reliable as during the months previously mentioned.

Your Guide to Tanzania Visa

Your Guide to Tanzania Visa

5 STAR RATED TOUR OPERATOR IN TANZANIA
Rated 5 out of 5
When you’re planning to visit Tanzania, it’s important to know about getting a Tanzanian Visa. There are two main ways to do it: you can either get a Visa on Arrival or an e-Visa that you apply for before you arrive in Tanzania.

Choosing Your Visa Option

If your trip is coming up within the next two weeks, it’s a good idea to get a Visa on Arrival, as long as you’re allowed to do so. To do this, you’ll need to provide some information about your visa, and we’ll give you the details you need in your booking voucher.

Who Needs a Tourist Visa for Tanzania?

Most people from different countries, like those in Europe, the UK, Australia, New Zealand, the US, Canada, and other parts of Latin America and Asia (except for Hong Kong and Singapore), need to apply for a visa before they travel to Tanzania. Don’t worry, though – the process is usually pretty straightforward. If you’re visiting Tanzania for tourism, you’ll need what’s called an Ordinary Visa. This kind of visa lets you enter Tanzania once and stay for up to three months. If you’re going to a conference, doing humanitarian work, or charity events, this is the visa for you. It costs $50, but if you’re from the US, you have to get a more expensive multiple-entry visa. Your passport should be valid for at least six months from the day you arrive in Tanzania. They might also ask you to show proof that you have a return ticket and enough money for your stay. People from Brazil, China, India, and Turkey who have special or diplomatic passports can enter Tanzania without a visa.

Multiple-entry visa

If you’re from the US or you plan to visit Tanzania more than once in a year, a multiple-entry visa is a good idea. It costs $100, and it lets you enter Tanzania many times within a year, staying up to three months each time. If you’re from another country, you have to explain why you need a multiple-entry visa, like if you’re going to Kenya or nearby countries as part of your trip. To get a multiple-entry visa, your passport should be good for at least six months from the day you enter Tanzania. You’ll also need a passport photo, proof of your return ticket to Tanzania, and maybe some other documents. Check with the Tanzanian embassy or consulate in your country for more details.

Getting Your Visa Online

Tanzania now has e-visas, which means you can apply for a visa online. All you need to do is provide your passport info, a scanned copy of your passport pages, a clear passport-style photo of yourself, and proof that you’ve paid. Some Tanzanian embassies and consulates in other countries can also process your application, but not all of them.

Getting a Visa When You Arrive

You can also get a visa when you arrive in Tanzania, no matter where you’re from. Before you make your travel plans, it’s a good idea to check the latest rules on the Tanzania Immigration Services Department website. You can get on-arrival visas at international airports in Dar es Salaam, Kilimanjaro, and Zanzibar. You can also get them at the Namanga border post between Tanzania and Kenya, and at the Tunduma border crossing between Tanzania and Zambia.

What to Expect with On Arrival Visa Process

When you arrive in Tanzania with a visa, you might be directed to the emergency visa checkpoint. This is where you can get your visa on arrival. Here’s what you’ll have to do:
  1. Wait in line for a Government Control Number.
  2. Wait in line at the bank to pay for your visa.
  3. Wait in line for Immigration to check your documents and give you your visa.
The lines can be long, and they might ask you for proof that you’re continuing your travels and that you have enough money for your stay. We strongly recommend that if you have enough time before you travel, you apply for your Tanzania visa online at https://www.immigration.go.tz/. The process for getting a visa on arrival can take more than two hours, and we’d rather you didn’t have to go through that.

Special Requirements like Yellow Fever

Not everyone needs a yellow fever vaccination certificate to enter Tanzania. However, if you’ve been to a country with yellow fever (like Kenya) within 21 days before you arrive in Tanzania, you will need to show a vaccination certificate. There are also special rules for citizens of 28 countries in Central Asia and Africa. They need special permission from the Commissioner-General of Immigration to travel to Tanzania. You can find a full list on the Immigration Services Department’s e-visa portal.

Transit and Extending Your Visa

If you’re just passing through Tanzania on your way to another country, like Kenya or Rwanda, you might only need a transit visa. It costs $30, but you can’t stay in Tanzania for more than seven days. You might need to show proof that you’re going to the next country. If you’re in Tanzania and want to stay longer than three months, it’s possible to extend your visa for another three months. You can do this at the immigration office in Dar es Salaam or other major Tanzanian cities. Keep in mind that visa rules can change, so it’s a good idea to check the official Tanzania Immigration website: https://www.immigration.go.tz/. This way, you’ll have the most up-to-date information for your trip.

Vaccinations and Health Precautions for Tanzania

Vaccinations and Health Precautions for Tanzania

5 STAR RATED TOUR OPERATOR IN TANZANIA
Rated 5 out of 5
Planning a trip to Tanzania involves more than just booking flights and accommodations. Ensuring your health and well-being during your journey is paramount. Here’s a comprehensive guide to the vaccinations and preventive measures you need to consider before setting foot in our beautiful country.

1. Vaccination Planning:

About one to two months before your departure to Tanzania, it’s advisable to schedule an appointment with your local travel clinic or GP. This proactive step allows you to discuss vaccinations and related concerns, giving you enough time to manage any potential side-effects before your trip.

2. Yellow Fever Requirement:

While climbing Kilimanjaro, most vaccinations are not obligatory. However, a Yellow Fever vaccination stands as an exception. This is compulsory for all travelers entering Tanzania from countries categorized as Yellow Fever risk zones.

3. Yellow Fever Certificate:

Entry into Tanzania might necessitate presenting a Yellow Fever vaccination certificate if you’ve departed from a Yellow Fever zone. Below is a list of countries falling under this category: Angola, Benin, Burkina Faso, Burundi, Cameroon, Central African Republic, Chad, Republic of the Congo, Democratic Republic of the Congo, Côte d’Ivoire, Equatorial Guinea, Ethiopia, Gabon, Gambia, Ghana, Guinea, Guinea-Bissau, Kenya, Liberia, Mali, Mauritania, Niger, Nigeria, Rwanda, Senegal, Sierra Leone, South Sudan, Sudan, Togo, Uganda.

4. Time Consideration and Side-Effects:

The Yellow Fever vaccine should be administered at least 10 days before your travel date. Some travelers report side-effects from this vaccine, so it’s wise to get it well in advance.

5. Vaccination Recommendations:

The Center for Disease Control (CDC) offers recommendations for immunizations when traveling to Tanzania. It’s essential to consult your healthcare professional for personalized advice: Routine Inoculations: Ensure your routine vaccines are up to date, including MMR (measles, mumps, and rubella), chickenpox, Diptheria, tetanus, polio, and yearly flu shots. Hepatitis A & B: Discuss hepatitis vaccinations with your doctor. Hepatitis A is contracted through contaminated food, water, and ice, while Hepatitis B spreads mainly through bodily fluids and needles. Typhoid: Exposure to typhoid through contaminated food and water is common in Africa, particularly in street-food markets or rural areas. Tetanus: Remember your 10-yearly tetanus shot, especially if you’re at risk due to cuts or abrasions. Rabies: If your plans involve potential exposure to infected animals, consider the rabies vaccine. Cholera: This waterborne disease can be a concern in certain regions. CDC recommends vaccination if you’re traveling to an area with active cholera transmission. Malaria: While mosquitos are generally absent above 6000ft on the mountain, be cautious in Moshi or Arusha before and after your climb, as malaria is prevalent. Consult your doctor for antimalarial prophylaxis options.

6. Intestinal Health and Traveler’s Diarrhea:

Be vigilant about avoiding stomach upsets. Prevent contamination by adhering to hygiene and food safety practices.

7. Medications to Bring:

In addition to prescribed medication, consider carrying antimalarials, antibiotics for bacterial diarrhea, Diamox if relevant, and basic pain relievers. Before embarking on your climb, a medical questionnaire will be provided, and a comprehensive medical check-up with your doctor is recommended. By prioritizing health and following these guidelines, you’re well-equipped to experience the wonders of Tanzania while staying safe and sound.

Will I Need Diamox to Aid Acclimatization on Kilimanjaro?

Climbing Kilimanjaro: Use Diamox or Not?

5 STAR RATED TOUR OPERATOR IN TANZANIA
Rated 5 out of 5
Diamox, also known as acetazolamide, is a prescription drug used for various purposes, including preventing and treating AMS (Acute Mountain Sickness). The FDA approved this medication back in 1953. Diamox works by acidifying the blood, which triggers increased respiration, thus aiding acclimatization. Research suggests that taking 250 mg of Diamox every 8 to 12 hours before and during rapid altitude ascent leads to milder AMS symptoms.

How Diamox Works

Most of the body’s carbon dioxide resides as bicarbonate in the blood. Diamox helps the body eliminate bicarbonate, making the blood more acidic. The body interprets acidic blood as having excessive carbon dioxide. Consequently, ventilation increases to expel the extra carbon dioxide, leading to deeper and faster breathing. This process, in turn, boosts oxygen intake, accelerating acclimatization. Diamox’s manufacturer reveals that their tests found that those treated with acetazolamide had improved pulmonary function, aiding both those with AMS symptoms and those without. This mechanism ultimately helps prevent and treat altitude sickness. While without Diamox, the body naturally adapts to higher altitudes by increasing breathing rate and depth.

Does Diamox Conceal AMS Symptoms?

Diamox doesn’t hide AMS symptoms; it addresses them. The FDA sanctioned Diamox for preventing and treating altitude sickness. Therefore, feeling better after taking Diamox indicates effective treatment. Diamox is advised as a preventive measure, taken 24-48 hours before ascending and during the climb (until descent). Some use it reactively, taking it only when AMS symptoms arise. Usage should continue until descending below the altitude where symptoms emerged. Diamox serves other purposes, such as treating glaucoma, epilepsy, and fluid retention. Hence, the drug’s effects might extend beyond pulmonary function enhancement.

Choosing Diamox for Kilimanjaro

The decision to use Diamox for AMS prevention is personal. Medications should be chosen carefully, considering potential pros and cons. That’s why our company doesn’t advocate or discourage Diamox usage. The choice rests with the climber. For experienced high-altitude hikers aware of their acclimatization limits, reviewing route profiles and itineraries aids the decision. Those confident in their acclimatization might skip Diamox. For first-timers, it’s tougher. Most wish to summit naturally, but prefer using Diamox over not summiting at all. Consequently, Diamox often makes sense, enhancing summit chances and safety.

Diamox Side Effects

Diamox has side effects, including tingling hands, frequent urination, hearing/taste loss, dizziness, upset stomach, vomiting, and diarrhea. Ironically, Diamox’s side effects sometimes mirror AMS symptoms. This can lead to confusion and abandoning the climb when unnecessary. To avoid this, try Diamox at home for a day or two to gauge its effects. If any side effects resemble altitude sickness or are unacceptable, avoid using it on Kilimanjaro. Acetazolamide comes in extended-release capsules containing 500mg, and regular-release tablets of 125 mg, 250 mg, and 500 mg.